
How to hang the hammock correctly?
Hennessy Hammock Suspension
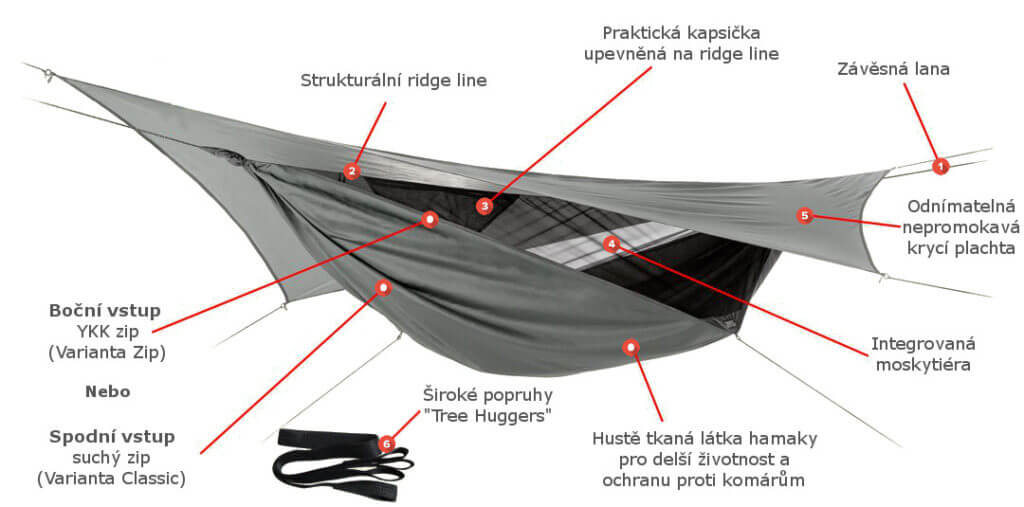
Hammock description
Before we tell you how to properly hang a Hennessy Hammock, let’s first quickly review what a hammock actually looks like and what it consists of. The picture above will help us with this.
The Hennessy hammock has two strong hanging ropes (1) at each end, which can carry more than six times the maximum load of the net. Between these ropes above the net we find a weaker rope. This rope is called a ridge line (2) and serves not only to hang a handy pouch (3), but also for several other purposes. Among the most important ones are that they keep the hammock always ideally sagging and the net is therefore comfortable almost regardless of how you hang it. The ridge line also holds a tightly woven mosquito net (4) over the hammock. As well as the mosquito net, the rope can also provide support for a waterproof cover(5), which then forms a small tent above you together with the mosquito net.
In addition to the hammock itself with integrated mosquito net and asymmetrically shaped waterproof tarp, the package also includes wide straps called“Tree Huggers” (6), which resemble car seat belts. These straps are used to protect the bark of the trees, so there is no trace of you after sleeping in the forest.
Each hammock from Hennessy Hammock can be purchased in two variants. The first variant has a Velcro bottom entrance and is called “Classic“. The second variant has an entrance from the side and is equipped with high-quality YKK zippers. This variant can be found in the shop under the name “Zip“. For more information on the differences between the Classic and Zip models, please see our FAQ section.
Let’s go hang
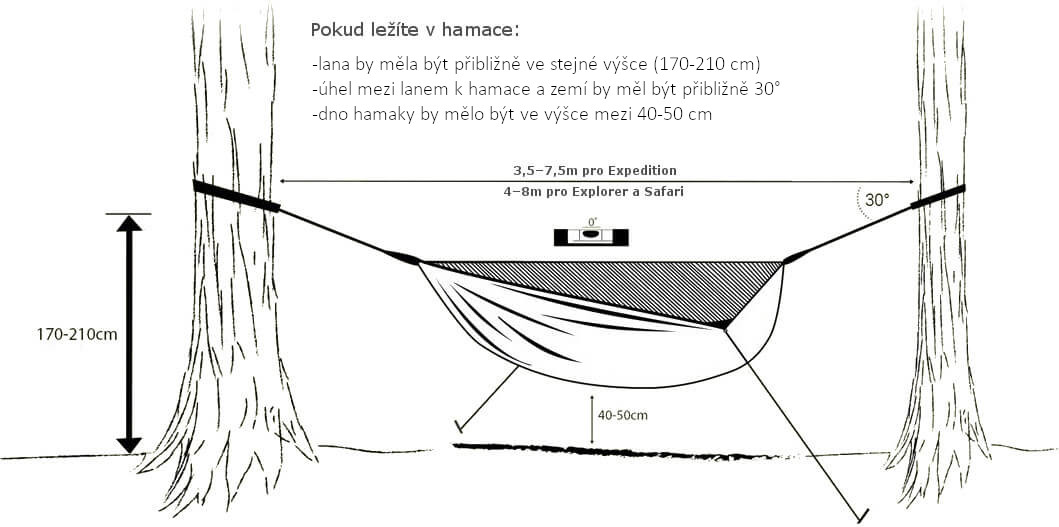
First you need to find two fixed points where you can tie the hammock. Two healthy trees can be used for this purpose, as well as, for example, two solid beams on the veranda, a tree and an eye in the wall. There are many possibilities and no limits to your imagination, so don’t be afraid to experiment a little. Note, however, that the points should be spaced apart
in the range of 3.5-7.5 m for models
Expedition
and between 4-8 m for the Expedition models
Explorer
and Safari.
After you find a nice spot, it’s time to tie the hammock itself. There are no hard and fast rules here and with a bit of exaggeration we can say that every adventurer has a different favourite way of tying. But we’ll talk about the method recommended by the founder of the company Hennessy Hammock Tom. As an experienced sailor, who is no stranger to ropes and knots, he had been thinking for a long time about which method of tying to use. He took into account the least possible wear and tear on the rope, the simplicity of tying and respect for the bark of trees and nature in general according to the Leave no trace philosophy, until he came up with this method:
Procedure
- First, wrap the Tree Huggers around the trees once or more at a height of 170 to 210 cm so that the ends with the eyelets point towards the second attachment point. The rule of thumb here is that the longer the distance between the trees, the higher we place the Tree Huggers.
- Think about where you want the entrance to the hammock. Then grasp the end of the rope and push it through the first eye in the nylon belt upwards and then through the second eye downwards. Use the same procedure at the other end of the hammock and pull the ends of the ropes to eject the hammock. If the rope is slipping down your eyes, you can secure it with a simple knot.
- Pull the hammock to a height of between 40-50 cm above the ground and make sure it is approximately midway between the trees. If so, you can move on to tying.
- To tie the hammock, grasp the end of the rope and wrap it underneath around the rope leading to the net. Push it between the ends of the Tree Hugger and tighten.
- Repeat the procedure described in point 4 at least three more times, only this time wrap the rope around the top.
- Tighten and secure the rope with two single loops. After tying, the rest of the rope should be at least 15 cm, this will ensure easy untying when folding the hammock.
- Go to the second rope, center the hammock and tie the rope as described above.
- For more comfort, you can anchor the hammock to the ground, trees or to the mesh of a waterproof tarp, which we’ll talk about in a moment. This will make it even more comfortable to lie in.
- Done! If you have succeeded, the hammock is hanging firmly as in the picture below and you can safely lie down in it and enjoy the nature. Well done!
Adding a tarpaulin so that even rain doesn’t surprise you
You can also attach a waterproof tarp to the hanging hammock, which is useful as protection against wind and rain, but also as protection against morning dew. Fixing it is easy:
- Unroll the waterproof cover and pull it over the ridge line.
- Compare the tarp with the hammock. Due to its asymmetrical shape, make sure that the corners on the sides of the tarp are above the side corners of the hammock.
- Snap the plastic loops at the ends of the sail into the carabiner tied to the suspension rope. Attach the second carabiner, which is at the end of the sail, directly to the hanging rope.
- Repeat the same procedure at the other end and centre the sail over the hammock.
- Tie the ropes that are on the side of the sail to a tree, a stake in the ground or other fixed point. If the weather is nice, you can put them up so that you have a nice view. Before going to bed or in bad weather, tie the ropes to the ground as close to the hammock as possible.
Hammock suspension DD Hammocks
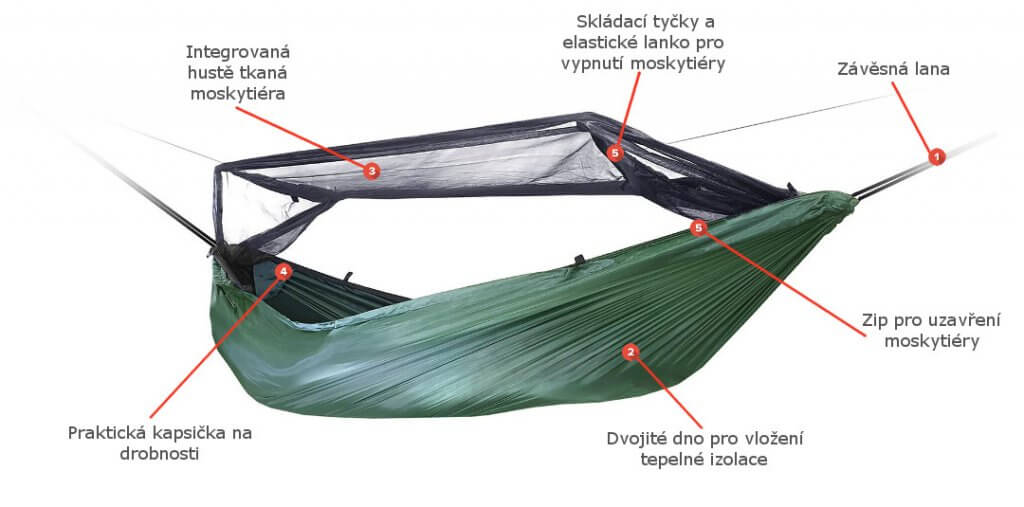
Description of the hammock DD Hammocks
Before we start hanging the DD Hammocks, let’s take a look at the picture to see the different parts of the hammock. No hammock is complete without strong suspension ropes (1). In the case of DD hammocks, it is a pair of strong flat ropes, which are unlike the classic ones, more gentle on the bark of trees. All DD Hammocks in our range have a double bottom for the insertion of thermal insulation (2). Some models, such as the Frontline or Travel/Bivi hammocks, are also equipped with an integrated mosquito net (3). It is fastened on both sides with zippers (4). To prevent the mosquito net from falling on you and to provide effective protection against insects, the folding rods and elastic cables (5) are used.
Hanging instructions for Camping, Frontline and Travel/Bivi hammocks
Now that we know what the DD Hammock looks like, we can get on with hanging it.
- We find two fixed mooring points at a distance of approximately 3 – 5 m.
- Remove the hammock from its packaging and pull the tie-down ropes so that the two ends of the hammock are pulled as far as possible.
- Grasp both ends of the lashing rope and wrap them once around the tree at approximately eye level against each other, so that after wrapping the ends face back towards the hammock.
- Tie the ends together in the same way as you tie your shoelaces.
- Take the second rope and tie it around the opposite tree in the same way.
- Let’s run a check. The ties should be approximately the same height and the hammock roughly in the middle of the trees at a height of at least 50 cm.
- When everything is okay, we try to sit down gently in the hammock. We have to take into account that the hammock will “sit” a little.
- If we have a Camping Hammock, all we have to do is stretch out and relax. If we own a Frontline or Travel/Bivi hammock, we move on.
- Fold the folding rods, which are used to switch off the mosquito net, and insert them into the small tunnels sewn on the mosquito net.
- Tie the attached elastic ropes with one end to the loops next to the tunnels and the other end around the tree so that the mosquito net is slightly stretched.
- Done. Well done! 🙂